You know me—I’m usually the guy shouting about stuffing entire Snickers bars inside a brownie that’s stuffed inside a cookie. I live for the “more is more” philosophy, and I love breaking the rules of baking just to see what kind of monster we can create! But sometimes, the wildest thing you can do is take a classic and execute it with absolute, undeniable perfection. I asked myself, “What if we take the humble thumbprint and give it the volume, the butteriness, and the jam-packed explosion of a Cookies Charm creation?” The result is this recipe.

These aren’t those dry, crumbly biscuits you find at the bottom of a holiday tin. These are buttery, melt-in-your-mouth flavor bombs that perfectly balance the richness of shortbread with the bright, tart punch of fruit preserves. We’re using a specific blend of sugars and a secret weapon (cornstarch!) to ensure these cookies stay soft, tender, and absolutely impossible to eat just one of. Get your thumbs ready, because we are about to make some magic.
Why This Recipe is a Total Flavor Bomb
Listen, I love a loaded cookie, but there is something undeniably epic about these jam-filled gems. Here is why you are going to be obsessed:
- Buttery Bliss: We are using a full cup of butter here. The texture is somewhere between a soft sugar cookie and a dense shortbread, meaning it literally melts when it hits your tongue.
- The Jam Explosion: Most recipes act like the jam is a garnish. Not here! We are filling these deep indents to the absolute brim. Every bite gives you that sticky, sweet-tart contrast that makes your tastebuds dance.
- No-Crack Guarantee: One of the biggest heartbreaks in baking is a thumbprint cookie that splits wide open. I’ve got a unique rolling method and ingredient ratio that keeps these smooth, round, and picture-perfect.
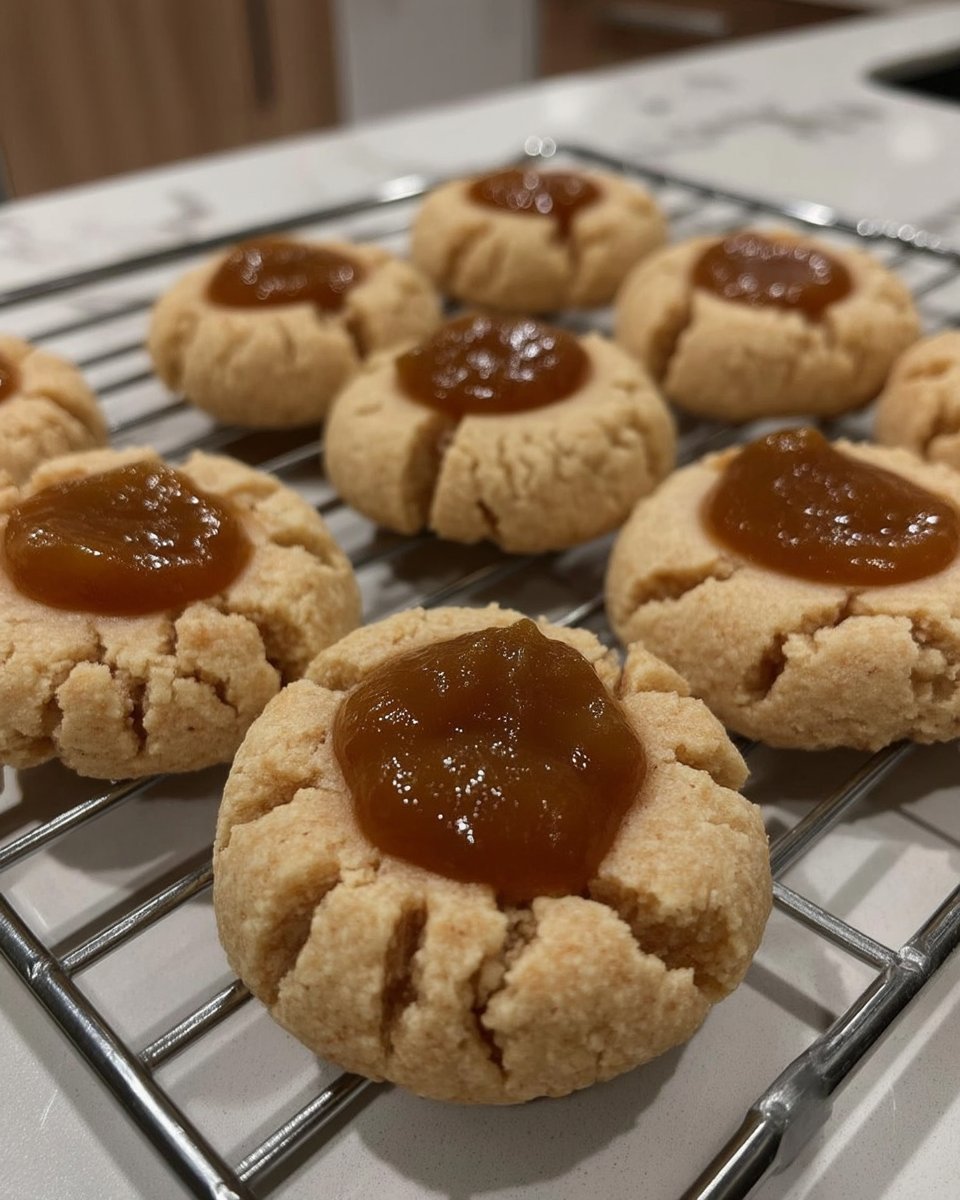
- Customizable Chaos: While I used raspberry preserves, this dough is a blank canvas. Apricot, strawberry, blackberry, or even chocolate ganache—you can go as wild as you want!

Thumbprint Cookies
- Total Time: 61 mins
- Yield: 24 cookies
- Diet: Vegetarian
Description
These buttery, melt-in-your-mouth thumbprint cookies feature a tender shortbread base and a vibrant jam center. A hint of cornstarch ensures a soft texture, making them the ultimate classic treat for any occasion.
Ingredients
- 1 cup unsalted butter, softened to room temperature
- 1/2 cup granulated sugar
- 1/4 cup light brown sugar, tightly packed
- 1 large egg yolk
- 1 teaspoon vanilla extract
- 2 1/4 cups all-purpose flour (280g)
- 2 tablespoons cornstarch
- 1/2 teaspoon salt
- Extra granulated sugar for rolling (optional)
- 1/2 cup jam or preserves (raspberry, strawberry, or apricot)
Instructions
- Cream the softened butter in a stand mixer fitted with the paddle attachment until smooth.
- Add the granulated sugar and light brown sugar, beating on medium-high for 30-60 seconds until fluffy.
- Mix in the egg yolk and vanilla extract until fully incorporated and the mixture is pale yellow.
- In a separate bowl, whisk together the all-purpose flour, cornstarch, and salt.
- Turn the mixer to low and gradually add the dry ingredients to the wet mixture, mixing until a cohesive dough forms.
- Roll the dough into 1-tablespoon sized balls, ensuring they are smooth and crack-free.
- Roll each ball in extra granulated sugar if desired, then place on a lined plate.
- Press a deep indent into the center of each ball using your thumb or the back of a measuring spoon.
- Freeze the indented dough for at least 30 minutes to prevent the cookies from spreading.
- Preheat oven to 375°F (190°C). Fill the frozen indents with slightly warmed jam.
- Bake for 11 minutes or until the edges just begin to turn golden. Cool completely on the baking sheet.
Notes
For the most professional look, use a round half-teaspoon measuring spoon to create uniform indents. If your dough feels dry or crumbly while rolling, the warmth from your hands will help soften the butter and bind the ingredients into a smooth ball. Ensure the jam is filled right to the brim before baking, as it will settle slightly in the oven.
- Prep Time: 20 mins
- Cook Time: 11 mins
- Category: Dessert
- Method: Baking
- Cuisine: American
Find it online: https://cookiescharm.com/thumbprint-cookies/
The Jam-Packed Arsenal

We are keeping the list simple, but every single ingredient plays a massive role in creating this texture. Don’t swap things out unless you want to break the rules in the wrong way!
- Unsalted Butter: This needs to be softened to room temperature. It is the backbone of the flavor, so use the good stuff if you can!
- Sugar & Light Brown Sugar: We use a mix! The white sugar gives crisp edges, while the brown sugar adds moisture and that deep caramel note.
- Egg Yolk: Just the yolk! This adds richness and tenderness without making the dough too cakey.
- Vanilla Extract: A heavy splash complements the butter perfectly.
- All-Purpose Flour: The structural integrity of our cookie vessel.
- Cornstarch: The secret weapon! This softens the proteins in the flour, ensuring your cookie is tender, not tough.
- Salt: Essential to balance out the sweetness of the jam and sugar.
- Granulated Sugar (for rolling): This optional step adds a lovely sparkly crunch to the exterior.
- Jam or Preserves: I went with raspberry for that classic red pop, but use whatever makes you happy. Pro tip: Stir it up so it’s smooth before filling!
How to Master the Thumbprint
Step 1: Cream the Butter Like a Pro
Start by placing your softened unsalted butter into the bowl of a stand mixer fitted with the paddle attachment. Beat it on medium speed until it is creamy and smooth. This isn’t just about mixing; we are aerating the butter to set up the texture. Scrape down the sides of the bowl—don’t leave any butter behind!
Step 2: Incorporate the Sugars
Add your granulated sugar and tightly packed light brown sugar to the butter. Beat this mixture, gradually increasing the speed to medium-high. You want to let this go for about 30-60 seconds until the ingredients are well-combined and the mixture looks fluffy. This creates that foundational structure we need.
Step 3: Add the Richness
Toss in the egg yolk and the vanilla extract. Beat the mixture well until the yolk is fully incorporated. The mixture should look rich and pale yellow. This yolk is what gives the cookie its “melt-in-your-mouth” quality compared to standard shortbread.
Step 4: Whisk the Dry Ingredients
In a separate medium-sized bowl, whisk together the all-purpose flour, cornstarch, and salt. Whisking ensures the cornstarch is evenly distributed so you don’t end up with pockets of starch in your dough. It also aerates the flour slightly for a lighter cookie.
Step 5: The Gentle Mix
Turn your mixer down to low speed. Gradually add the flour mixture to the wet ingredients. Watch carefully! The dough will seem very dry and crumbly at first. Pause occasionally to scrape the sides and bottom of the bowl. If your mixer starts to struggle, stop and use your hands to finish working the dough together. It should come together into a cohesive ball without being sticky.
Step 6: Roll and Coat
This is the crucial technique! Scoop the dough into 1 Tablespoon-sized balls. Roll them *very* well between your palms. You want the dough to be warm and completely smooth with absolutely no cracks or seams. This prevents the cookie from splitting later. If you are feeling extra, roll each ball in the extra granulated sugar for a sparkly finish.
Step 7: The Thumbprint Technique
Place the balls on a plate or small cookie sheet lined with wax paper. Use your thumb (or the rounded back of a teaspoon measuring spoon for uniformity) to gently press an indent into the center of each ball. Press down deep, but not all the way through. If you see tiny cracks forming, gently smooth them out with your fingers immediately.
Step 8: The Big Chill
Transfer the plate of indented dough to the freezer and chill for at least 30 minutes. Do not skip this! Freezing solidifies the butter, ensuring the cookies keep their tall, thick shape and don’t spread into flat puddles in the oven.
Step 9: Jam Session
Once the dough is done chilling, preheat your oven to 375°F (190°C). Place your jam in a small microwave-safe bowl and heat it briefly (5-10 seconds) just to loosen it up. You want it stirrable, not hot lava. Spoon the jam into each frozen thumbprint, filling it right to the brim.
Step 10: Bake to Perfection
Place the cookies at least 2 inches apart on a parchment paper-lined baking sheet. Bake for 11 minutes, or until the edges are just barely beginning to turn golden brown. Do not overbake! They might look slightly underdone in the center, but they will set as they cool. Let them cool completely on the baking sheet before enjoying.
Riley’s Secrets for Perfect Prints

I’ve made enough cookies to fill a stadium, so trust me when I say these tips are the difference between a “meh” cookie and a “WOAH” cookie. We want perfection!
- Weigh Your Flour: I say this all the time, but if you scoop your flour with the cup, you might be adding too much, leading to dry, crumbly dough that cracks. Use a kitchen scale for accuracy (280g is the magic number).
- The Cornstarch Magic: Don’t skip the cornstarch. It mimics cake flour and keeps the gluten development low, ensuring that soft, tender bite. It’s a trick I use when I want a texture similar to our scottish shortbread but with a little more durability for holding the jam.
- Smooth Moves: When rolling the balls, the heat from your hands helps bind the dough. If the dough feels too dry to roll smoothly, keep working it in your hands for another minute. The warmth will melt the butter slightly and help it come together.
- The Spoon Hack: While they are called “thumbprints,” I actually prefer using the back of a 1/2 teaspoon measuring spoon. It creates a perfectly round, uniform divot that looks professional and holds exactly the right amount of jam.
- Don’t Rush the Cool: The jam gets incredibly hot in the oven. If you bite into these straight away, you *will* burn your tongue. Let them set! The jam needs to firm up slightly to get that perfect chewy texture.
Switch Up Your Jam Game
You know I can’t resist mixing things up. While raspberry is the classic choice, there are so many ways to customize these little flavor vessels. Here are a few ideas to get your creative juices flowing:
- The Chocolate Lover: Skip the fruit jam and bake the indented cookies empty. immediately after baking, place a Hershey’s Kiss in the center (like our peanut butter blossom cookies) or fill firmly with chocolate ganache once cooled.
- Salted Caramel: Fill the centers with a thick caramel sauce and sprinkle a few flakes of sea salt on top before serving. It’s a sticky, sweet-salty dream.
- Nutty Crunch: Instead of rolling the dough balls in sugar, roll them in finely chopped pecans or walnuts before making the indent. Fill with apricot preserves for a sophisticated, nutty twist.
- Lemon Burst: Add a tablespoon of lemon zest to the dough and fill with lemon curd instead of jam. It’s like sunshine in a cookie!
How to Party With These Cookies

These cookies are absolute showstoppers on a dessert table because they look like little jewels. Here is how I like to serve them up for maximum impact:
- The Holiday Platter: These red-centered cookies look festive and bright. Arrange them in a circle on a platter, maybe alternating with snow-white snowball cookies or our colorful italian christmas cookies for a stunning holiday spread.
- Tea Time Tower: If you want to feel fancy, stack these high on a tiered cake stand. The jam glistens under the lights and makes them look incredibly elegant.
- Gift Boxes: Because these cookies are sturdy once cooled, they travel really well. Stack them in clear cellophane bags tied with a ribbon for the perfect edible gift.
- Warm & Gooey: Okay, I said let them cool, but… if you zap one in the microwave for 5 seconds so the jam gets gooey again, and serve it with a scoop of vanilla ice cream? Game changer.
The Sweetest Sign Off
There you have it! Proof that you don’t always need three layers of brownies and a candy bar to make a cookie that people will talk about for days. Sometimes, just mastering the classics with a little “go big or go home” attitude regarding the butter and jam is all you need.
These Thumbprint Cookies are a testament to the fact that simple ingredients, treated with love (and a little bit of freezing time), can create something spectacular. If you are still on a buttery cookie kick after this, you absolutely have to try my dipped shortbread recipe next—it’s another melt-in-your-mouth winner. And hey, if you want to see another baker’s take on this classic, check out the version over at Sugar Spun Run for even more inspiration.
Now, go preheat that oven and get your thumbs ready. It’s baking time!